


Goolge's Kubernetes gives you the ability of managing a cluster of containers across multiple nodes and provide mechanisms for deploying, maintaining, and scaling applications. Usually in a container application uses a on-disk files which are ephemeral by the nature of the container concept. Kubernetes provides a solution for this problem by introducing the 'volumes' which resolves the aforementioned problem as well as the file sharing problem we encounter when we using several containers in a single pod or running several replicas of the same pod.
Taking the Kubernates volumes in to next level, we can use a network file system such a "GlusterFS" to manage the file system across the physical machines (nodes) and let it handle the replication, security and data availability.
Following example will show you how to configure two physical machines with glusterFS replication and boot-up kubernetes pods across those node with shared volume mounted.
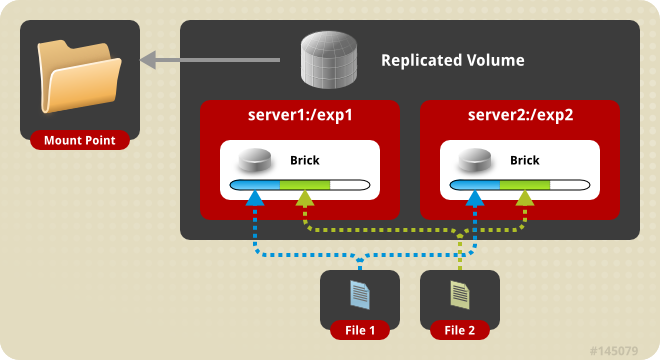
image source : https://cloud.githubusercontent.com/assets/10970993/7412379/d75272a6-ef5f-11e4-869a-c355e8505747.png
1. Setup the nodes with glusterfs
We will use two physical machines which we are going to identify as server-1 and server-2 here after, for ease of access add the following entries with suitable IP addresses to /etc/hosts of the each machine.
192.168.1.240 server-1192.168.1.241 server-2
I'll explain how to set up the server-1 with glusterfs, follow the same steps and configure the server-2 once you completed with the server-1.
1.1 Install the glusterfs-server
If you using a dabian- based OS use apt to install the required packages.
apt-get install glusterfs-server
use following command to verify the proper installation of the package.
glusterfsd --version
above command should give a output similar to following.
Repository revision: git://git.gluster.com/glusterfs.git
Copyright (c) 2006-2013 Red Hat, Inc.
GlusterFS comes with ABSOLUTELY NO WARRANTY.
It is licensed to you under your choice of the GNU Lesser
General Public License, version 3 or any later version (LGPLv3
or later), or the GNU General Public License, version 2 (GPLv2),
in all cases as published by the Free Software Foundation.
Note: Make sure tcp ports 111, 24007, 24008 and 24009 open for the server's by your firewall.
1.2 Add the peer node to trusted storage pool
On server-1 add the server-2 as a trusted storage
gluster peer probe server-2
You can check the status of the peers using following command.
gluster peer status
Note: Now you have successfully configured the server-1 with glusterfs, follow the same steps with proper changes to configure the server-2
1.3 Create the shared volume with replicas
Now we can create the shared volume with required replicas (here we using 2 replicas because the mirroring to take effect). Following command will create the shared volume and set up the data directories in the nodes. You can specify any directory you wish to store the data in each node. If this command gives an error saying the data directories should be created in a separate physical volume, you can override it with using 'force' keyword at the end of the command.
gluster volume create test-volume replica 2 transport tcp server-1:/home/user/data server-2:/home/user/data
Start the above created volume using following command
gluster volume start test-volume
Check the status of the volumes using following command
gluster volume info
It should give you a output similar to this.
Volume Name: test-volume
Type: Replicate
Volume ID: a13d64b6-7e07-4253-895e-d736e176b59f
Status: Started
Number of Bricks: 1 x 2 = 2
Transport-type: tcp
Bricks:
Brick1: server-1:/home/user/data
Brick2: server-2:/home/user/data
Note : If the volume info doesn't give you the expected output, just restart the glusterFS-server and check the info again.
Now you completed the setup of shared volume and for testing the operation mount the created volume to a directory of any of physical nodes and add, delete files and see the replication works.
Use the mount.glusterfs command to mount the shared volume.
mount.glusterfs server-1:/test-volume /mnt/glusterfs
2 Use the shared volume as a mountVolume in kubernetes pod
In order to use the glusterFS volumes in kubernetes nodes you will have to configure kubernetes endpoints that are pointed to glusterFS servers. This will gives you the flexibility of using entire different set of servers to use as the gluster-cluster and mount those volumes. In addition we have to add a kubernetes service to be used by pods.
Refer the following yaml configurations to start the kubernetes components.
Endpoint :
---
  kind: "Endpoints"
  apiVersion: "v1"
  metadata:
    name: "glusterfs-cluster"
  subsets:
    -
      addresses:
        - ip: "192.168.1.240"
      ports:
        - port: 1
    -
      addresses:
        - ip: "192.168.1.241"
      ports:
        - port: 1
Service:
---
  kind: "Service"
  apiVersion: "v1"
  metadata:
    name: "glusterfs-cluster"
  spec:
    ports:
      - port: 1
Pod:
---
  apiVersion: "v1"
  id: "glusterfs"
  kind: "Pod"
  metadata:
    name: "glusterfs"
  spec:
    containers:
      - name: "glusterfs"
        image: "your-test-image"
        volumeMounts:
          - mountPath: "/mnt/glusterfs"
            name: "glusterfsvol"
    volumes:
      - name: "glusterfsvol"
        glusterfs:
          endpoints: "glusterfs-cluster"
          path: "test-volume"
          readOnly: false
Use kubectl command kubectl create -f file-location.yaml to create each component. In pod definition use name of the shared volume in glusterFS as the path and specify a proper image in container specification.
Log in to the pod and test that volume is mounted on path /mnt/glusterfs without an issue.
1 comments:
Great blog.. It help to understand how to setup the nodes with glusterfs by using kubernetes service. Thanks for sharing
Post a Comment
Please give your comments.